With the launch of the snazzy new OS X Mavericks, Apple also updated its iLife and iWork suite. The good news is that both iLife and iWork is now free for all Mac users, and the new look UI and enhanced features mean better productivity and usability. Naturally with updates, Apple does make changes to how things work, and may even remove certain functionality. Here we look at how to extract image(s) from an Apple Pages document.
Even in previous versions of Apple’s word processor, extracting images from a document was never a straight forward process. Being King of the Hill for ‘drag-and-drop’, Pages strangely never supported drag-and-drop of images/objects direct to the Desktop. Instead when you do a drag-and-drop, it becomes a Clipping, which isn’t exactly what users would require.
In Pages 4.0 and below though, you could drag the image filename from the Inspector directly to the Desktop/Finder, giving you access to the original file, at its original resolution.
Unfortunately with the latest Pages 5.0, Apple removed that functionality. Why? We don’t really know.
So here are two quick ways to extract images from a Pages 5.0 document.
Here’s how
Follow these easy steps:
Locate the document in the Finder.
Control/Right-Click on its icon.
Select Show Package Contents.
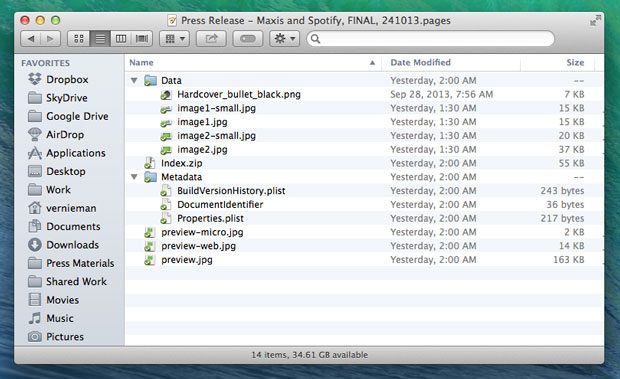
All images and embedded objects appear in ‘Data’ folder.
Alternatively, although not the most ideal method is to:
- Double-click on icon to open file
- Select image by clicking on it
- Command+C to copy the image
- Open an image editor like Photoshop
- Command+N or File > New to create a new document
- Command+V to paste image into document
- Save image
As I use Pages regularly, as do some of you out there, I do hope and wish that Apple integrates an Export Image function for easy extraction of images from within documents. Quite a handicap if you ask me. Pretty please, Apple?


